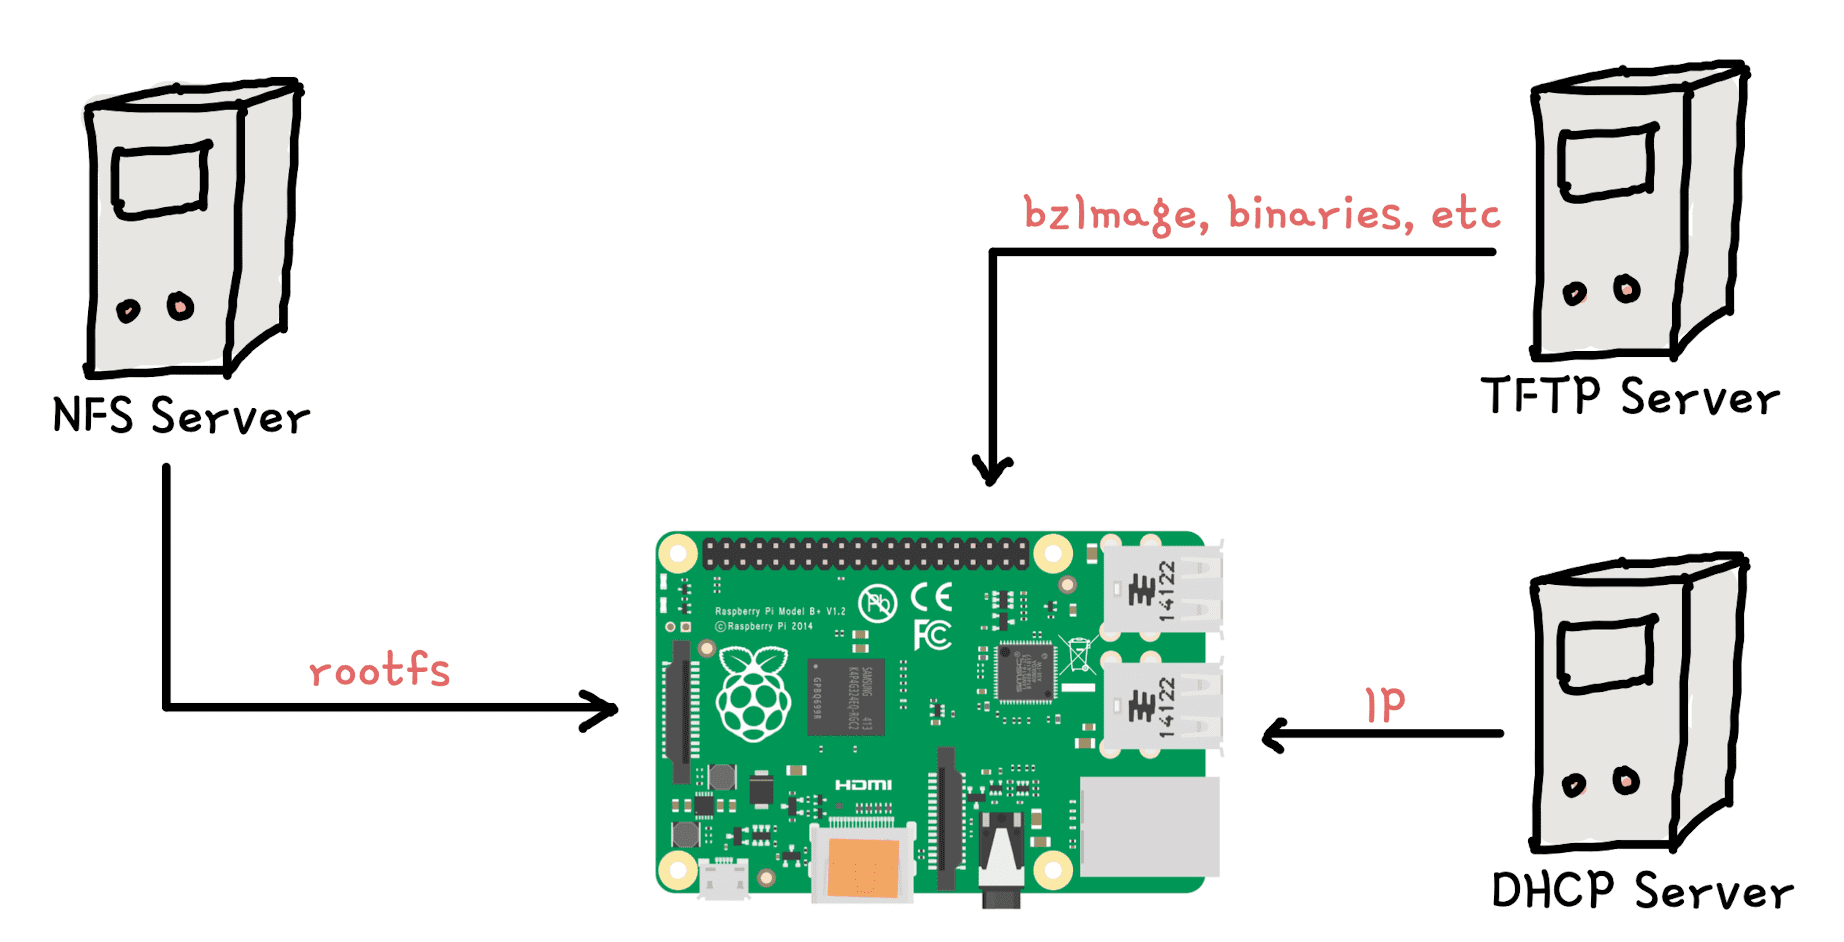
If you have ever done system development, specifically OS development, you can relate that a typical development workflow includes building images on host, copying them to USB/SD card and then plugging it to the target development board. But this cannot scale and can easily exhaust you. This is where a network boot setup comes handy. Not limited to boot, a TFTP server can also be used to pull post-boot userspace (or application) binaries/libraries. This article does not target a specific use case, but covers the installation steps of 3 major pillars of such a setup, namely:
- DHCP
- TFTP
- NFS

Secondly, though my setup is an Ubuntu 20 machine, the commands are applicable to the majority of linux distributions. You may need to tweak them for corresponding package managers, in case you are on other distros.
Installing DHCP server
The major task of a DHCP server is to maintain a pool of IPs and provide IP to the host sending requests. To install DHCP server, use
$ sudo apt-get install isc-dhcp-serverOnce installation is done, you need to edit the following 2 files. The first file controls, which network interface you want DHCP to listen requests :
code@slashinit:~$ cat /etc/default/isc-dhcp-server
# Defaults for isc-dhcp-server (sourced by /etc/init.d/isc-dhcp-server)

# Path to dhcpd's config file (default: /etc/dhcp/dhcpd.conf).
#DHCPDv4_CONF=/etc/dhcp/dhcpd.conf
#DHCPDv6_CONF=/etc/dhcp/dhcpd6.conf

# Path to dhcpd's PID file (default: /var/run/dhcpd.pid).
#DHCPDv4_PID=/var/run/dhcpd.pid
#DHCPDv6_PID=/var/run/dhcpd6.pid

# Additional options to start dhcpd with.
#       Don't use options -cf or -pf here; use DHCPD_CONF/ DHCPD_PID instead
#OPTIONS=""

# On what interfaces should the DHCP server (dhcpd) serve DHCP requests?
#       Separate multiple interfaces with spaces, e.g. "eth0 eth1".
INTERFACESv4="enx34298f700058"
INTERFACESv6=""
Configuration of the below file is optional. By default, DHCP gives dynamic IPs. But in case you want to get static IPs for your development boards, this file is useful. The highlighted lines below shows how you can request a static IP. The mac address is used to identify the machine sending DHCP requests and the corresponding actions are taken. In the below example, our hikey board will get a static IP of 10.0.0.225.
code@slashinit:~$ cat /etc/dhcp/dhcpd.conf

ddns-update-style none;
default-lease-time 600;

allow bootp;
allow booting;
subnet 10.0.0.0 netmask 255.255.255.0 {
range 10.0.0.100 10.0.0.200;
option subnet-mask 255.255.255.0;
option routers 10.0.0.1;
default-lease-time 600;
max-lease-time 7200;
}

host hikey {
hardware ethernet 34:29:8f:70:06:d0;
fixed-address 10.0.0.225;
}
Now you can restart your dhcp server for changes to take effect
$ sudo service isc-dhcp-server restartYou can see dhcp server logs in /var/log/syslog.
Installing TFTP server
TFTP server is used to load binaries and images to your development/target host. We can use it to load a kernel image from a bootloader and boot. You can install TFTP server using :
$ sudo apt-get install tftpd-hpaOnce installed, edit the following file :
TFTP_USERNAME="tftp"
TFTP_DIRECTORY="/home/naveen/tftpboot"
TFTP_ADDRESS=":69"
TFTP_OPTIONS="--secure"
Restart the server
$ sudo service tftpd-hpa restartNow you can put content in the TFTP_DIRECTORY path configured above.
Installing NFS server
NFS stands for “Network File System” and does what the name tells. It can be used to provide a rootfs over the network to your target development board. You can copy your binaries/images directly to this server and your OS running on target development board will be able to see them, often without a reboot. You can install NFS server using :
$ sudo apt-get install nfs-kernel-serverYou need to edit the following file :
code@slashinit:~$ cat /etc/exports
# /etc/exports: the access control list for filesystems which may be exported
#               to NFS clients.  See exports(5).
#
# Example for NFSv2 and NFSv3:
# /srv/homes       hostname1(rw,sync,no_subtree_check) hostname2(ro,sync,no_subtree_check)
#
# Example for NFSv4:
# /srv/nfs4        gss/krb5i(rw,sync,fsid=0,crossmnt,no_subtree_check)
# /srv/nfs4/homes  gss/krb5i(rw,sync,no_subtree_check)
#
/home/naveen/rootfs-arm64     *(rw,sync,no_root_squash,no_subtree_check)
Instead of `*`, you can put an IP so that only that specific IP can access the contents of the NFS server.
Restart the server
$ sudo service nfs-kernel-server restartConclusion
In this post we discussed the steps to install DHCP, TFTP and NFS servers. We did not target any specific use case because there can be lot. These servers can be either used in combination or as separate services, depending on the use case. We will keep revisiting this post in future articles, as it’s a crucial part of any development setup.